Tuesday 24 January 2017

Embroidered Frog

Embroidered Frog
Embroidered Frog
 
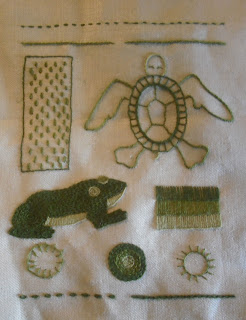
I made this frog to add to the sampler for the Crewel Embroidery Course I am taking. Later I am going to explain the techniques used to lay out the stitches to build the frog.
 
Finished Sampler
Sampler


Here is a finished picture of the sampler with the two completed animal motifs. I explained how to make the turtle in a previous article. I added a rectangle at the top with an open filling. This is done in the Link Powdering Stitch which is made of Detached Chain Stitches placed at regular intervals. The rectangle at the bottom is done in solid Buttonhole Stitch. Each row done in a lighter colour for shading. For the row of circles at the bottom I made the middle a solid filling of Chain Stitches. The two on either side are Buttonhole wheels. One of the wheels has the stitches facing the inside and the other has the stitches facing the outside.


Frog Accents
Frog Accents
Frog Stitching Body
Frog Stitching Body
I embroidered the light accents on the frog first. The belly is worked in a solid Buttonhole Stitch. The stitches follow along the curved edge and are shortened as the space narrows. The circle is in Stem Stitch which spirals around from the outside toward the center. The eyelid is a Buttonhole Scallop with a row of Stem Stitch that curves around the bottom of the eye to take a more circular shape.
 
 
Frog Rear Stitching
Frog Rear Stitching
The rest of the frog is filled in with Chain Stitch. I worked in four separate sections first filling in the body. Then the front foot, the back leg and last the back foot. By looking at the stitches on the rear side it is easier to see the paths that the stitches follow. The sections are worked from the outside to the center same as the circle on the sampler. Each row of stitches is finished off after working all the way around the shape. Then a separate row of chain stitch is started beside it rather than spiralling around. I found this filled the irregular shapes in the frog better with out pulling the stitches into an oval shape.   


Monday 16 January 2017

Monograms for ABrowns Designs

needle_monogram
Needle Monogram
This week I have been working on a symbol for ABrowns Designs. I wanted some I could stitch as monograms. So I could take pictures of them and choose one to use as the icon on the blog. I also wanted ones that were easy to draw so that I could possibly use one for a logo too. On the left side is my favourite one of all of them. The needle makes up one side of the A and the thread curls around to make a capital A with a small b beside it. I started by sketching out several designs and came up with two that I could fairly easily draw and stitch up. The design is very simple in the first sketches and both are made so they could be worked in one continuous line with the same thread. The next set is more advanced. After I came up with the idea to make the first slash of the A into a needle.


Needle_sketches
Needle Sketches
AB_Sketches
AB_Sketches


AB Couching

AB_Running_Stitch
AB_Running Stitch
 

I tried curly AB in a running stitch first. It worked well on such a small scale and I think it could make a nice mark for signing a piece of needle work. Next I tried it larger and used a zig zag couching stitch. Both of these designs are done in cotton floss were very quick to work up.  

On the final piece for the needle I used a mixture of two strands of rayon thread and a strand of mettallic silver. The metallic thread on it's own was much too shiny to look like a needle. When I mixed it with a grey cotton it didn't have enough shine and the

Raised Stitches
Raised Stitches
metallic thread didn't blend well. The rayon thread is glossier and the metallic didn't out stand as much just added a little sparkle. I made a base of back stitches as shown in the picture on the right to give the needle a raised look. I used two strands for the outer edge and the eye of the needle.  Then four strands down the center so that it would have a curved look. The top stitches for the needle come through and entered just below the edge of base layer so the thread wraps around creating more of a curve. For the purple thread I used a stem stitch from six strands of cotton floss. Please comment and let me know which of the three finished monograms you like best the needle, the running stitch or the couching stitch?


Tuesday 10 January 2017

Crewel Embroidery Sampler

Sampler in Frame
Sampler in Frame
This week I spent working on the Crewel Embroidery course I am taking. We start off by making a sampler for a portfolio that is built during the course. On the right I have a picture of the started sampler stretched out in the frame. This was a gift from a friend who was worried that I would hurt my neck by working stooped over. I've been using this for years and in the course I learned how to properly stretch the fabric out in my frame. By lacing the sides of the fabric around the edge. This stretches the fabric out much tighter and made a big difference in how well it works. I will be adding a few more examples of the basic stitches and a couple designs.


Pencil Turtle
Pencil Turtle
Coloured Turtle
Coloured Turtle
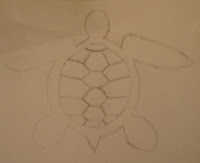
I have been working on two animal designs for the center. I drew a few basic sketches to work from and decided the one on the left was the best for this. Next I drew a coloured turtle thinking about how to lay out some of the stitches. I used a different colour of pencil for each kind of stitch.


Embroidered Turtle
Embroidered Turtle
The finished turtle is worked on the left in red wool. First I drew the design on the fabric with a pencil. For the outline of the shell I used a row of Blanket stitches. Then I topped the Blanket stitches with a row of Stem Stitch. I completed the center of the shell with lines of Double Running Stitch. The legs, head and tail are all worked in outline stitch. The final turtle on the sampler will be in shades of green to match. I have started working on the sketches for a frog to put on as well. I should have pictures of these up soon. 


Monday 2 January 2017

Embroideries by Alice Brown

Alice Brown Designer
Floral Stumpwork
Floral Stumpwork
Hi my name is Alice Brown.
I have a degree in New Media Communications and Design from the College of New Caledonia. I recently started taking a crewel embroidery course and am working towards getting a teachers certificate in embroidery. I decided to combine my hobby of embroidery and textile arts and my computer design skills into a new job and start an online business in the coming year. I have embroidered for many years and sold lots of pieces overtime. I would like to start with a few pictures of pieces I made in the past.


Grape Vine French Knots

I will be posting more pictures of the designs and pieces while I am making them. Sharing the process with you and some of the techniques that I use while creating them. The blog will include many of the interesting bits that I learn along the way and some of the really great pieces that I see.

I will be showing designs and pieces of artwork as I complete them. Letting you know what will be coming up for sale and when  new designs or products are going to be available. I will also mention some of the products that I use or try out along the way. I encourage people to have fun making things and am planning some on and offline events for later in the year so we can have some fun together.


Celtic Mandala Satin Stitch
Celtic Mandala Satin Sitch

Please share your thoughts about what designs you like or don't like as I decide how to grow the business. I am also interested in hearing what techniques other people are using and where they have been learning them. You can leave questions and comments on the blog. I will reply when doing the updates. Email me here and get an answer with in a few days. I hope that you enjoy the pictures and learn from reading the posts.