Wednesday, 28 February 2018

Poppy Biscornu

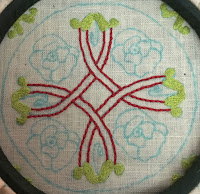
Celtic Knot and Leaves
A biscornu is a pin cushion made of two squares of fabric. The squares are offset and when sewn together make a hexagon shape. I will give the instructions on how to sew it together in the next post along with pictures of the finished embroideries. The square is 4 inches. I am about half way done the embroidery on the topside. The bottom will have minimal amount of embroidery with just a small poppy on each corner.
Poppy LeavesClose up Poppy Leaf
The pair of leaves in each corner is accented by a small yellow circle beneath. The leaves are done in long and short stitch and the circle is done in satin stitch. 

Back Stitch OutlineWhipped Back Stitch Outline

The outline of the Celtic Knot is done in whipped back stitch. I did the back stitch first trying to keep the stitches the same size so the twists would be the same distance apart. The longer the back stitches the farther apart the twists will be.
Filling Chain StitchedFilling Padded Satin Stitch

The filling is first stitched over in chain stitch. I used several strands of thread to make the stitches thick so they would stand up above the outline. I worked the Satin stitch from one side to the other giving the filling a rounded look. All I have left now is the flowers and the assembly. I hope to have the finished project posted soon.

Saturday, 10 February 2018

Winter Vegetables


Here are some vegetables that are more readily available in the winter time. A yellow onion and a bunch of watercress. The onion is done in long and short stitch with outline stitch and stem stitch. The watercress is done in stem stitch and broad stem stitch with couching and satin stitch in the leaves.


I traced the onion on to the fabric. Then drew guidelines to show the direction of the stitches. I worked from the darkest part of the onion towards the lightest part. When I switched to a lighter colour I did a few rows with one strand of the lighter and one strand of the darker colour mixed together.

The outline and the detail of the onion are done in outline stitch. The roots at the bottom are done in stem stitch. The long and short stitch covered the guidelines for the detail of the onion so I worked by following the pattern.


The tie on the bunch was worked first since I wanted it to look like it was in front of the stalks. I used the stem stitch done with two strands of wool. The stalks were worked in broad stem stitch. I filled in the stalks that looked like they would be in the front first and went along filling in every second stalk. Then filling the spaces up with the remaining stalks.  
As I switched to the darker green I started working the ones in the front first again. As I climbed up the stalks I couched the outline of  the smaller leaves. This way I had an edge to end the stems going behind the leaves.   


The small leaves are filled in with satin stitches. The larger leaves are couched around the same as the small leaves. The satin stitches go halfway across leaf and meet in the middle. The join is covered later with straight stitches showing the veins in the leaf.