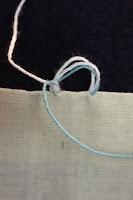
 After making the needle roll I wanted to experiment with making some more button loops. To see if I could come up with some that were more interesting than the one used on the last piece. Some of them turned out better than others. The white loop with the blue bullion picots was the one that worked out best of all.
They are made in the same way as making a needle lace bar covered with buttonhole stitch and picots along it. First make three loops in the edge of the material. Start to cover the bar in buttonhole stitch. After about 5 stitches make the picot. These pictures show the start of the loop and the bullion picot. Wrap the thread around the needle and pull it through making a rounded knot.
 To make the loop two colours I used a second needle and thread. Then ran the blue thread along the bar underneath the buttonhole stitches. When I came to the place to make the picot. I slid the blue thread through the last buttonhole stitch and made the bullion knot. With the white thread behind the knot I continued along with the buttonhole stitches.
If the number of wraps on the bullion knot is increased the picot will be larger. The more buttonholes between the picots the farther apart they will be.
I used a quilting ruler to measure and mark out the loops. To make sure they were all the same size and distance apart.
The buttonhole picot is made by forming a little loop. The larger the loop the longer the picot will be. Work a row of buttonhole stitches up to the top of the loop. At the top slide the needle back through the blanket stitches to hold them in place. Repeat for each picot.
The woven picot is started by making a loop like the buttonhole. Hold the loop in place with the second needle. Bring the thread back up to the top of the loop so there is a thread in the middle. Weave back and forth between the three threads till the bottom of the loop.


No comments:
Post a Comment